Whipped Cream. Whipped Cream. Whipped Cream. We have so many memories as kids sneaking into the refrigerator to open the can of whipped cream, tilt our heads back and empty the contents into our bellies. It was so good and so bad for us at the same time. Now we can do it as an adult at home without feeling guilty. So today we want to show you how to make homemade whipped cream with some tips and tricks we have learned along the way.
How to Make Homemade Whipped Cream
Who knew there was so much information on how to make homemade whipped cream? Well, there doesn’t have to be, but we like to make sure we provide you all the information you could need.
You can use full-fat coconut milk for this recipe or Raw Cream if you have a dairy allergy.
We want to be clear, the only raw dairy we recommend and use is from Organic Pastures. We are friends with the owners, know how well they treat their animals and their products are top notch. Make sure you check them out on Facebook and tell them the Caveman Team sent you.
Types of milk to make homemade whipped cream
So these are all the options we have used and tested while working on this post for how to make homemade whipped cream.
For the Dairy Version – We use Organic Pastures Raw Cream
For the Non-Dairy Version – We use Coconut Milk and here are our notes:
- Native Forest Premium Coconut Milk – This has guar gum but is packaged in a BPA free can. This is our number one choice because Thrive Market carries it and it turns out perfectly every time. Get it at Thrive Market or on Amazon here.
- Trader Joe’s Coconut Cream – This is our second option when it comes to coconut milk whipped cream for the results it creates. There are some questionable ingredients, but it hasn’t made us sick, so it’s ok as a second choice. You can get it on Amazon here.
- Thai Kitchen Full-Fat Coconut Milk – This can has guar gum and is packaged in a BPA can. So if you are avoiding BPA’s, throw this can out and don’t even try it. For the whipped cream, it works as long as you use the full-fat but the volume is a little less than the Native Forest. You can get it on Amazon here.
Now if you didn’t catch our drift above, we highly recommend you use the Native Forest Coconut Milk and stick with it. It works every time and has never failed us.
Tips for making your Whipped Cream Succeed
While we claim to be perfect chefs, we mess up often and have learned a few lessons along the way. With those lessons, we can help you not make the same mistakes so here are some tips while learning how to make homemade whipped cream.
- ALWAYS, we repeat always use Full-Fat Coconut milk.
- Store your coconut milk in the refrigerator and that way you are always ready to make whipped cream.
- To help your whipped cream succeed, store your mixing bowl or mixer bowl in the refrigerator for an hour before making.
- Always make more than you think you need. You will end up eating more than you thought.
- Note: If your coconut milk didn’t work, you probably got a dud can without the right fat content. You can fix it though. During the whipping process, try adding 1-4 tablespoons of tapioca flour slowly until it forms whipped cream. This can work but is not guaranteed.
How to Freeze Whipped Cream
To our delight, we found that homemade whipped cream freezes very well. We discovered this by accident when one of our team members plated the whipped cream, froze it and then ate it like ice cream. It was genius!
To freeze your leftover homemade whipped cream, dollop spoonfuls of whipped cream onto a parchment-lined baking sheet. You can use a piping bag to make it fancy, or just throw it down by the spoonful.
Place the baking sheet in the freezer until your homemade whipped cream is frozen solid. Transfer the whipped cream to a freezer bag until needed.
In case you need ideas on how to use frozen whipped cream, here are a few of our favorites:
Equipment
Kitchen Aid 5 Qt Stand Mixer
Kitchen Aid 6 Qt Professional Stand Mixer
Hand Mixer
Kitchen Aid Pro Line Hand Blender
Ingredients
Method
- If using coconut milk, place the can of coconut milk in the refrigerator and leave it there until well-chilled; we left ours in overnight.
- Remove from refrigerator, flip the can and open the can of coconut milk.
- There should be some water, pour this out separately and save to make smoothies.
- Now you should have all coconut cream that is solidified.
- Put this coconut cream in the bowl of a stand mixer or a large bowl.
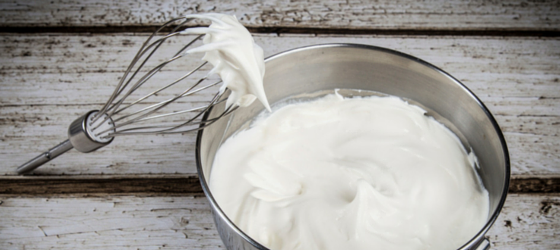
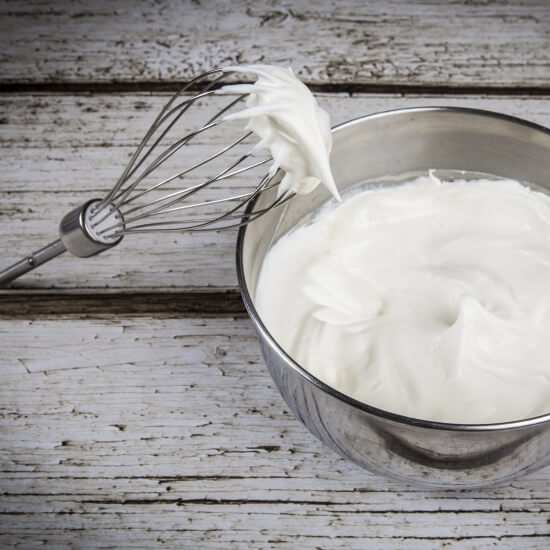
- Turn your mixer or hand beaters to high speed and whip the coconut cream for 3 to 5 minutes.
- Whip until it becomes fluffy and light with soft peaks.
- Mix in the sugar and/or vanilla if using.
- Serve with fresh fruit, brownies or just eat it fro the bowl
- If you are going to add freeze dried fruit, add your freeze dried fruit to a food processor and blend to a powder. Once powdered, add your fruit to your homemade whipped cream after you have finished whipping the cream.
Want to learn which ingredients are the best to cook with?
Check out our friends over at Wellness Force Radio and learn about how good nutrition impacts your health:


 Easy Hard Boiled Eggs – 2 ways without Boiling water